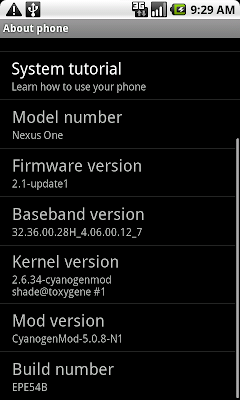
I have just installed the CyanogenMod-6 first release candidate V6.0.0-RC1 (07/11/2010) ([ROM] CyanogenMod-6 for Nexus One: Holy crap,full of AWESOME! V6.0.0-RC1 (07/11/2010) on XDA-developers) — the one that brings Froyo (Android 2.2) to my Nexus One.
As I had already installed the radio image radio-4.06.00.12_7.img when I had installed the CyanogenMod-5 5.0.8-N1, this time, I just have to upgrade to the new CyanogenMod-6 6.0.0-RC1.
So Cyanogen's instructions to upgrade are :
- Upgrading?
1. Do a Nandroid Backup!
2. Install the CyanogenMod-6 V6.0.0-N1-RC1 - 07/11/2010 ROM (your Google apps will be backed up automatically)
I add a 3rd step to Cyanogen's instructions to install the most up to date version of Google apps :
3. Optionally install the FRF91-HDPI Google Addon as CyanongenMod 5.0.8 installs EPF30+ Google Addon
The detailed instructions to follow are the same as for Nexus One - how to upgrade to CyanogenMod-5 [stable 5.0.6 version of 04/15/2010] - detailled instructions to get the CyanogenMod-6 V6.0.0-N1-RC1 ROM update-cm-6.0.0-N1-RC1-signed.zip installed, skipping the WIPE steps 12) and 13) as it is not a first install and as Cyanogen doesn't require a WIPE in it's instructions.
Then I do again step 15) to install the FRF91-HDPI Google Addon gapps-hdpi-FRF91-signed.zip and I finish by a power down on step 17) instead of a reboot.
On step 18) everything started as usual, but the boot time was longer.
First surprise, the screen looks like my personalized screen instead of the new Froyo screen. Then my Gmail account was unavailable, and it was impossible to register a new one, making any synchronization impossible.
I then have to perform a factory reset to solve the problem. Everything works well now. But it suggests Cyanogen's instructions need another step to perform some kind of wipe.
The new CyanogenMod-6 comes with new wallpapers.
Wednesday, July 14, 2010
Wednesday, July 7, 2010
Track Site 1.02.42 - an improved user interface
Track Site user interface has been improved a lot over the last releases. Here is a review of the improvements.
The main screen
On the upper part of the main screen are, from left to right :
The multiple tags selector screen
This screen appears when the multiple tags filter button has been touch. Here, you can :
The bookmarks editor screen
This screens allows to edit bookmarks information :
There are 2 ways to get on this screen :
The multiple tags management screen
This screen allows for bookmark's tag management :
The main screen
On the upper part of the main screen are, from left to right :
- the bookmarks import button, which allows to import bookmarks from the stock Android browser. Just touch it and the bookmarks that have been defined since the last import will be imported into Track Site under the tag « imported »
- the multiple tags filter display, which shows the tags on which the bookmarks are filtered on
- the multiple tags filter button, which allows to set the multiple tags filter
The multiple tags selector screen
This screen appears when the multiple tags filter button has been touch. Here, you can :
- sort the tags alphabetically ; please note that selected tags have a green check on the right and that checked tags are grouped before unchecked tags to allow for better understanding
- just touch a tag to check or uncheck it ; please note that the bookmarks will be displayed only if they are tagged by all the bookmarks that are in the filter
- the clear button uncheck all the tags in one touch
- the cancel button allows to return to the main screen without changing the tag filter
- the Ok button activates the new tag filter
The bookmarks editor screen
This screens allows to edit bookmarks information :
- edit bookmark's information : the name, the description, the URL, the tags (touching the button displays the tags management screen)
- save your changes, making them permanent
- delete the bookmark : a confirmation dialog appears to confirm your decision as deleted bookmarks can't be undeleted
- just return to the main screen, discarding any change that can have been underway
There are 2 ways to get on this screen :
- using the menu button and choose the « create » or « edit » menu items
- by long pressing on the bookmark, then touching « create » or « edit » items on the contextual menu that appears above the screen
The multiple tags management screen
This screen allows for bookmark's tag management :
- selecting one or more tags
- defining new tags ; created tags are automatically checked
Subscribe to:
Comments (Atom)


