(source : Les Lapins Crétins pour le Motorola DEFY from Le Journal du Geek)
Wednesday, October 27, 2010

Tuesday, October 19, 2010
ProGuard obfuscation : error Could not load definitions from resource proguard/ant/task.properties
I've just tried to obfuscate my TrackSite app with ProGuard following Dan Galpin's instructions from Proguard, Android, and the Licensing Server.
I've encountered the « Could not load definitions from resource proguard/ant/task.properties » error during the
The add-proguard-release.xml provided with the Proguard, Android, and the Licensing Server contains the following definitions at lines 19 and 29
This refers to a task.properties file. According to the article Obfuscating Your MIDlet Suite from the Sun Developer Network (look for section « Ant Script ») this file is included into the proguard.jar jar file distributed with ProGuard, inside the .jar file.
Then, the solution is to update the property at line 19 to point to the real location of the proguard.jar archive, that is located in the lib/ sub-directory. So the property's value should be « value="${proguard.dir}/lib/proguard.jar" »
The
I've encountered the « Could not load definitions from resource proguard/ant/task.properties » error during the
ant release build :
compile:

    [javac] /Users/raph/droid/android-sdk-mac/tools/ant/ant_rules_r3.xml:336: warning: 'includeantruntime' was not set, defaulting to build.sysclasspath=last; set to false for repeatable builds

    [javac] Compiling 1 source file to /Users/raph/droid/workspace/TrackSites/bin/classes


-dex-obfuscate:

  [taskdef] Could not load definitions from resource proguard/ant/task.properties. It could not be found.

   [delete] Deleting: /Users/raph/droid/workspace/TrackSites/obf/original.jar

      [jar] Building jar: /Users/raph/droid/workspace/TrackSites/obf/original.jar


BUILD FAILED
The add-proguard-release.xml provided with the Proguard, Android, and the Licensing Server contains the following definitions at lines 19 and 29
<property name="proguard-jar" value="${proguard.dir}/proguard.jar" />

...

<taskdef resource="proguard/ant/task.properties" classpath="${proguard-jar}" />
This refers to a task.properties file. According to the article Obfuscating Your MIDlet Suite from the Sun Developer Network (look for section « Ant Script ») this file is included into the proguard.jar jar file distributed with ProGuard, inside the .jar file.
Then, the solution is to update the property at line 19 to point to the real location of the proguard.jar archive, that is located in the lib/ sub-directory. So the property's value should be « value="${proguard.dir}/lib/proguard.jar" »
<property name="proguard-jar" value="${proguard.dir}/lib/proguard.jar" />
The
ant release build then looks like :
compile:

    [javac] /Users/raph/droid/android-sdk-mac/tools/ant/ant_rules_r3.xml:336: warning: 'includeantruntime' was not set, defaulting to build.sysclasspath=last; set to false for repeatable builds

    [javac] Compiling 1 source file to /Users/raph/droid/workspace/TrackSites/bin/classes


-dex-obfuscate:

   [delete] Deleting: /Users/raph/droid/workspace/TrackSites/obf/original.jar

      [jar] Building jar: /Users/raph/droid/workspace/TrackSites/obf/original.jar

 [proguard] ProGuard, version 4.5.1

 [proguard] Reading input...

 [proguard] Reading program jar [/Users/raph/droid/workspace/TrackSites/obf/original.jar]

 [proguard] Reading library jar [/Users/raph/droid/android-sdk-mac/platforms/android-8/android.jar]

 [proguard] Reading library directory [/Users/raph/droid/workspace/TrackSites/libs]

 [proguard] Initializing...

 [proguard] Note: the configuration refers to the unknown class 'com.android.vending.licensing.ILicensingService'

 [proguard] Note: there were 1 references to unknown classes.

 [proguard]       You should check your configuration for typos.

 [proguard] Ignoring unused library classes...

 ...
Monday, August 23, 2010
Android - what an Android tablet just can't be
There's a lot of Android tablets announced out there. According to their specifications, most of them are unable to bring a somewhat new user experience beyond the one Android phones already bring.
An Android tablet just can't be an Android phone with some interfaces (USB, HDMI, ...) and a wider 7+ inch screen but limited to a 800x480 resolution.
An Android tablet just can't be an Android phone with some interfaces (USB, HDMI, ...) and a wider 7+ inch screen but limited to a 800x480 resolution.
Sunday, August 8, 2010
Track Site 1.02.44 - adding support for QVGA (240x320) screen devices (Xperia X10 Mini and the likes)
Following Shantanu's post on QVGA screen (240x320) devices support (Android Dev Tip: App Not Showing on X10 Mini Marketplace), I just release a new version of Track Site (1.02.44).
Some screenshots from the emulator :


The screen is tiny but it works fine :

Drop me an email or add a comment (better) to let me know how it's behave on a real device.
Some screenshots from the emulator :


The screen is tiny but it works fine :

Drop me an email or add a comment (better) to let me know how it's behave on a real device.
Wednesday, July 14, 2010
Nexus One - how to upgrade to CyanogenMod-6 V6.0.0-RC1 (07/11/2010) - instructions
I have just installed the CyanogenMod-6 first release candidate V6.0.0-RC1 (07/11/2010) ([ROM] CyanogenMod-6 for Nexus One: Holy crap,full of AWESOME! V6.0.0-RC1 (07/11/2010) on XDA-developers) — the one that brings Froyo (Android 2.2) to my Nexus One.
As I had already installed the radio image radio-4.06.00.12_7.img when I had installed the CyanogenMod-5 5.0.8-N1, this time, I just have to upgrade to the new CyanogenMod-6 6.0.0-RC1.
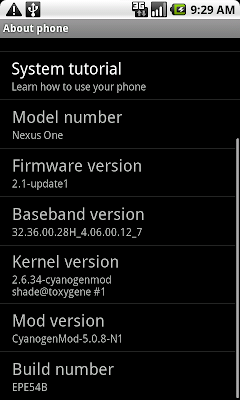
So Cyanogen's instructions to upgrade are :
- Upgrading?
1. Do a Nandroid Backup!
2. Install the CyanogenMod-6 V6.0.0-N1-RC1 - 07/11/2010 ROM (your Google apps will be backed up automatically)
I add a 3rd step to Cyanogen's instructions to install the most up to date version of Google apps :
3. Optionally install the FRF91-HDPI Google Addon as CyanongenMod 5.0.8 installs EPF30+ Google Addon
The detailed instructions to follow are the same as for Nexus One - how to upgrade to CyanogenMod-5 [stable 5.0.6 version of 04/15/2010] - detailled instructions to get the CyanogenMod-6 V6.0.0-N1-RC1 ROM update-cm-6.0.0-N1-RC1-signed.zip installed, skipping the WIPE steps 12) and 13) as it is not a first install and as Cyanogen doesn't require a WIPE in it's instructions.
Then I do again step 15) to install the FRF91-HDPI Google Addon gapps-hdpi-FRF91-signed.zip and I finish by a power down on step 17) instead of a reboot.
On step 18) everything started as usual, but the boot time was longer.

First surprise, the screen looks like my personalized screen instead of the new Froyo screen. Then my Gmail account was unavailable, and it was impossible to register a new one, making any synchronization impossible.
I then have to perform a factory reset to solve the problem. Everything works well now. But it suggests Cyanogen's instructions need another step to perform some kind of wipe.

The new CyanogenMod-6 comes with new wallpapers.

As I had already installed the radio image radio-4.06.00.12_7.img when I had installed the CyanogenMod-5 5.0.8-N1, this time, I just have to upgrade to the new CyanogenMod-6 6.0.0-RC1.

So Cyanogen's instructions to upgrade are :
- Upgrading?
1. Do a Nandroid Backup!
2. Install the CyanogenMod-6 V6.0.0-N1-RC1 - 07/11/2010 ROM (your Google apps will be backed up automatically)
I add a 3rd step to Cyanogen's instructions to install the most up to date version of Google apps :
3. Optionally install the FRF91-HDPI Google Addon as CyanongenMod 5.0.8 installs EPF30+ Google Addon
The detailed instructions to follow are the same as for Nexus One - how to upgrade to CyanogenMod-5 [stable 5.0.6 version of 04/15/2010] - detailled instructions to get the CyanogenMod-6 V6.0.0-N1-RC1 ROM update-cm-6.0.0-N1-RC1-signed.zip installed, skipping the WIPE steps 12) and 13) as it is not a first install and as Cyanogen doesn't require a WIPE in it's instructions.
Then I do again step 15) to install the FRF91-HDPI Google Addon gapps-hdpi-FRF91-signed.zip and I finish by a power down on step 17) instead of a reboot.
On step 18) everything started as usual, but the boot time was longer.

First surprise, the screen looks like my personalized screen instead of the new Froyo screen. Then my Gmail account was unavailable, and it was impossible to register a new one, making any synchronization impossible.
I then have to perform a factory reset to solve the problem. Everything works well now. But it suggests Cyanogen's instructions need another step to perform some kind of wipe.

The new CyanogenMod-6 comes with new wallpapers.

Wednesday, July 7, 2010
Track Site 1.02.42 - an improved user interface
Track Site user interface has been improved a lot over the last releases. Here is a review of the improvements.
The main screen

On the upper part of the main screen are, from left to right :
The multiple tags selector screen

This screen appears when the multiple tags filter button has been touch. Here, you can :
The bookmarks editor screen

This screens allows to edit bookmarks information :
There are 2 ways to get on this screen :
The multiple tags management screen

This screen allows for bookmark's tag management :
The main screen

On the upper part of the main screen are, from left to right :
- the bookmarks import button, which allows to import bookmarks from the stock Android browser. Just touch it and the bookmarks that have been defined since the last import will be imported into Track Site under the tag « imported »
- the multiple tags filter display, which shows the tags on which the bookmarks are filtered on
- the multiple tags filter button, which allows to set the multiple tags filter
The multiple tags selector screen

This screen appears when the multiple tags filter button has been touch. Here, you can :
- sort the tags alphabetically ; please note that selected tags have a green check on the right and that checked tags are grouped before unchecked tags to allow for better understanding
- just touch a tag to check or uncheck it ; please note that the bookmarks will be displayed only if they are tagged by all the bookmarks that are in the filter
- the clear button uncheck all the tags in one touch
- the cancel button allows to return to the main screen without changing the tag filter
- the Ok button activates the new tag filter
The bookmarks editor screen

This screens allows to edit bookmarks information :
- edit bookmark's information : the name, the description, the URL, the tags (touching the button displays the tags management screen)
- save your changes, making them permanent
- delete the bookmark : a confirmation dialog appears to confirm your decision as deleted bookmarks can't be undeleted
- just return to the main screen, discarding any change that can have been underway
There are 2 ways to get on this screen :
- using the menu button and choose the « create » or « edit » menu items
- by long pressing on the bookmark, then touching « create » or « edit » items on the contextual menu that appears above the screen
The multiple tags management screen

This screen allows for bookmark's tag management :
- selecting one or more tags
- defining new tags ; created tags are automatically checked
Monday, June 21, 2010
Nexus One - how to upgrade to CyanogenMod-5 [stable V5.0.8 (06/19/2010)] - instructions
The new 5.0.8 CyanogenMod has been released : CyanogenMod-5 for Nexus One: Kang Central Station V5.0.8 (06/19/2010) ([ROM] CyanogenMod-5: Kang Central Station (STABLE) [06/19/2010 / 5.0.8]).
Here are the detailed instructions to install it.
As the Nexus One's radio image has to be flashed to the Froyo's one, the instructions to follow are the ones Cyanogen gives for a first install, starting from step 2 with a wipe on step 4 :
- First time flashing CM to your Nexus (or coming from another ROM)?
1. Unlock your device and install Clockwork Recovery or Amon_RA's recovery image
2. Do a Nandroid backup!
3. Update your radio if necessary
4. WIPE
5. Install the ROM
5. Optionally install the Google Addon
If it's the first time flashing your Nexus, start from step 1 !! Directions can be found in the post Nexus One - CyanogenMod For Nexus One V5.0.5.3 (03/23/2010).
It may be useful to read the full process here How to Root Your Nexus One as well as other resources I have used for the initial root of my Nexus
Nexus One - CyanogenMod For Nexus One V5.0.5.3 (03/23/2010). Detailed instructions on the Cyanogen firmware upgrade process can also be found in my other post
Nexus One - how to upgrade to CyanogenMod-5 [stable 5.0.6 version of 04/15/2010] - detailled instructions.
So let's start :
Latest version: 5.0.8-N1 - 06/19/2010
Download: http://cyanogen-updater.googlecode.com/files/update-cm-5.0.8-N1-signed.zip
Download: http://android.chemlab.org/android/nexus/update-cm-5.0.8-N1-signed.zip
MD5Sum:
Google Addon: EPF30+
Mirror: http://www.mediafire.com/download.php?mjzwozjojkh
Radio Firmware: FRF50 (FROYO RADIO, REQUIRED!)
Download: http://android.chemlab.org/android/nexus/radio-4.06.00.12_7.img
MD5Sum:
Here are the detailed instructions to install it.
As the Nexus One's radio image has to be flashed to the Froyo's one, the instructions to follow are the ones Cyanogen gives for a first install, starting from step 2 with a wipe on step 4 :
- First time flashing CM to your Nexus (or coming from another ROM)?
1. Unlock your device and install Clockwork Recovery or Amon_RA's recovery image
2. Do a Nandroid backup!
3. Update your radio if necessary
4. WIPE
5. Install the ROM
5. Optionally install the Google Addon
If it's the first time flashing your Nexus, start from step 1 !! Directions can be found in the post Nexus One - CyanogenMod For Nexus One V5.0.5.3 (03/23/2010).
It may be useful to read the full process here How to Root Your Nexus One as well as other resources I have used for the initial root of my Nexus
Nexus One - CyanogenMod For Nexus One V5.0.5.3 (03/23/2010). Detailed instructions on the Cyanogen firmware upgrade process can also be found in my other post
Nexus One - how to upgrade to CyanogenMod-5 [stable 5.0.6 version of 04/15/2010] - detailled instructions.
So let's start :
- first, prepare everything that is needed. Download all the images : CyanogenMod 5.0.8-N1 latest version, EPF30+ Google Addon and FRF50 Radio Firmware
- check the MD5 checksum of the CyanogenMod 5.0.8-N1 and FRF50 Radio Firmware files with a
md5 the file to checkon the command line - connect your Nexus to your computer and mount it turning on USB storage mode, then copy the CyanogenMod 5.0.8-N1 and EPF30+ Google Addon files to the root of your SDcard but leave the FRF50 Radio Firmware on your computer as it will be flashed using a “
fastboot flash radio the radio .img file” command from your computer's command line - ensure the fastboot utility is in your PATH. The fastboot utility is not in the standard Android SDK on Mac but it can be found in the SuperBoot image which contains a fastboot version for Mac, Linux and Windows. Choose the one that pertains to your platform and put it in the
android/toolsdirectory, renaming it simply asfastboot - proceed with step 2 : the Nandroid backup. Follow detailed instructions from step 5 to step 11 of the post Nexus One - how to upgrade to CyanogenMod-5 [stable 5.0.6 version of 04/15/2010] - detailled instructions
- at then end of step 11, on screen "android system recovery", use the track ball to choose power off item (the last one), then press the track ball to select the option, and press the track ball a second time on the question to confirm the power off
- let's proceed with step 3 : update your radio. The following is based on instructions from How to Root Your Nexus One
- Boot the phone while holding down the VOLUMEDOWN-key. The screens turns white with 3 green Androids skating at the bottom of the screen. FASTBOOT is hilighted in blue. Press power button to enter fastboot mode.
- on your computer, open a command line shell. Navigate to the directory where the
radio-4.06.00.12_7.imgradio image has been stored. Then enter the command./fastboot flash radio radio-4.06.00.12_7.img. The fastboot command starts by sending the radio image and display a statussending 'radio' (26112 KB)... OKAY, then writes the radio image ans display a statuswriting 'radio'... OKAY. - back on your Nexus, select POWER DOWN item on the FASTBOOT USB screen using VOL DOWN key, then press power button.
- time to proceed with step 4 : WIPE. Reboot in RECOVERY mode by pressing power button while holding down the VOLUMEDOWN-key. The screens turns white with 3 green Androids skating at the bottom of the screen. FASTBOOT is hilighted in blue. Press VOL DOWN key to hilight RECOVERY, then press power button. The Nexus boot screen (the 4 colors cross) appears followed by the Cyan "Android system recovery" screen
- Use the trackball to hilight the "Wipe" item then press the trackball. On the "Choose wipe item" screen, wipe everything as stated on step 6 Wipe of How to Root Your Nexus One.
- select the first open and press the scrollball
- press the scrollball again to confirm
- then repeat for all items on the Wipe page
Press the Down-volume button to return to the prior menu. - it's time to proceed with step 5 : install the ROM. Back to the "Android system recovery" cyan screen, use the trackball to select item "Flash zip from sdcard", then press the trackball.
- the screen "Choose update ZIP file" shows the 2 zip files
update-cm-5.0.8-N1-signed.zipandgapps-passion-EPF30-signed.zipthat were written on the SDcard at the beginning of the process. Select the "update-cm-5.0.8-N1-signed.zip" then press the trackball to install it, pressing the trackball another time to confirm. - continue with step 5 again : optionally install the Google Addon.perform the same steps another time to install the
gapps-passion-EPF30-signed.zipthat contains Google's apps. - Back to the "Android system recovery" cyan screen, use the trackball to select item "Power off", then press the trackball to confirm.
- That's all Folks !! Reboot your Nexus and enjoy ;-)
Latest version: 5.0.8-N1 - 06/19/2010
Download: http://cyanogen-updater.googlecode.com/files/update-cm-5.0.8-N1-signed.zip
Download: http://android.chemlab.org/android/nexus/update-cm-5.0.8-N1-signed.zip
MD5Sum:
70aa95ee1b22101901cd75e9bc6e92baGoogle Addon: EPF30+
Mirror: http://www.mediafire.com/download.php?mjzwozjojkh
Radio Firmware: FRF50 (FROYO RADIO, REQUIRED!)
Download: http://android.chemlab.org/android/nexus/radio-4.06.00.12_7.img
MD5Sum:
3321c196d8ec1cf748fd20c3c4068520
Sunday, June 13, 2010
Track Site 1.02.34 - french language localization
French language support has been introduced in the version 1.02.34 of Track Site.


Tuesday, June 8, 2010
Track Site 1.02.32 - import bookmarks from stock browser
This new release of Track Site (v1.02.32) introduces the import of stock browser's bookmarks. Import is accessible through « Menu », then « More » and finally « Import browser's bookmarks ». Bookmarks that have been created since the last import are imported and tagged with « imported». Bookmarks are imported into Track Site whether they already exists or not.


Wednesday, June 2, 2010
Track Site - 1.01.31 - now build for Eclair (Android 2.1)
The 1.01.31 version of TrackSite is now build for Android 2.1 (aka Eclair). It may still work on Android 1.6 (Cupcake) devices.
This version introduces a local database to store the bookmarks and the additional infos — the description and the tag list. More to come on this side as the stock browser's bookmarks are also stored in a database.
Introducing a local database make the app working even when the SDcard has been removed.
Existing bookmarks from
This version introduces a local database to store the bookmarks and the additional infos — the description and the tag list. More to come on this side as the stock browser's bookmarks are also stored in a database.
Introducing a local database make the app working even when the SDcard has been removed.
Existing bookmarks from
/sdcard/sites.ini file are automatically loaded into the database at first launch.
Subscribe to:
Posts (Atom)